Wednesday, October 31, 2012

How to make that Halloween Candy downright educational

There is candy GALORE in my house.
It's only going to get worse tonight!


How do we make the sugar-filled holiday useful while our children's teeth are rotting out?
Explore Candy with our kids.
Here are a few simple ideas to try with your kids:

1) Sort your candy stash!  

For young kids, try something simple like:

Little and Big

Or, allow your kid to choose how they sort.
This is especially good for kids.  Let them choose.
Then ask them how they sorted and why.

Then.....listen.

It's hard for me too :)
Boxes, bags, clear wrapping, plastic wrapping, foil, etc

2) Count your candy stash!

Charlotte has just learned about the number "30" and is practicing counting to 30.  She wanted her 3rd piece of candy yesterday and I told her she had to successfully count 30 pieces of candy (dropping them into the plastic pumpkin as she counted) to be able to eat a new piece.  She stumbled on 15 (for some reason she doesn't like that number) about 3 times.  

Finally, she made it. 

Candy is quite motivating, after all!


Hopefully your counting doesn't end in crying :)

Adelyn and I are practicing counting to 10 while dropping a piece of candy in the pumpkin as we go.  This is called one-to-one correspondence.  One number for one piece of candy.  It's something that kids have to learn...they have to practice.  There are tons of kindergarteners who don't have 1-to-1 correspondence.  So, it's a great skill to use candy to reinforce.

Also, have kids count any bags of candies they open like M &Ms or Skittles.


3) Make "math-y" problems with your candy

I like to ask after Charlotte opens an M&M bag....
How many blues are there?
How many reds are there?
How many more reds are there than blue?

Or. One of my girls' favorites :)

How many skittles do you have? (lets say they answer 10)
wait for them to eat one
Make a really big deal out of this loss.  
"OH NO! YOU ATE ONE SKITTLE! How many do you have left?"

That game can last for an entire bag of skittles!


Enjoy that sugar.
Happy Halloween :)


Tuesday, October 30, 2012

Make your own books

One of the things I learned about children's books in my grad program was how over-stimulating most children't learning books really are.  Number books are notorious for putting a million things on a page instead of just a number and that number of objects.  When we're trying to use books to teach something, the more "busy" a page is, the less kids are able to focus on what they are supposed to be learning.  Your best bet?  Make your own books for whatever your child is learning about.

What do you need to make your own kid-book?
  • 1 piece of construction paper or cardstock for the cover
  • printer paper
  • Crayons, markers
  • Any printed pictures you might need
  • glue
  • scissors
Directions: However many pages you want your book to be (let's say 20) you'll need to divide by 2 (to get 10) and add 1.  So you'll need 11 pieces of printer paper to make a 20 page book.  Put the construction paper or cardstock on the outside of your 11 pieces of printer paper.  Fold the whole thing in half.  Staple 3 or 4 times along the folded edge to bind your book.  Write the title on the front and also on the first page as a title page.  Now you're ready to add whatever contents you want!


There are some added benefits to your kids making their own books with you.

Fine motor skills are among the skills that kindergarteners struggle with the most because they haven't practiced or experienced them enough on their own.  You can choose how much you want your kid to help, depending on their age.  Here are some ideas:
  • Let them cut out pictures with kid-friendly scissors (3 yrs+)
  • Let them color pictures with crayons (18 months+)
  • Let them glue the pictures into the book (2 1/2 yrs+)
  • Let them write some of the words in the book (or trace words) (3 yrs+)
  • Let your child choose graphics


Charlotte loves to glue by herself

Cutting is another favorite activity

The great thing about making your own books is that they can be about pretty much anything you want them to be about.  If your child is in Preschool or Sunday School, you could choose to create a book about a topic that will support what they are already learning.  

Yesterday we talked a lot about Charlotte and rhyming words.  Without going into a ton of detail about literacy development, it's safe to say: rhyming words are really instrumental in reading (phonemic awareness) and later in spelling (with word study). 

We're studying really basic word patterns right now, so we made a book about words that end with -at.  Charlotte is just learning about reading, so I chose a book with a repetitive pattern.  If your kid has books like this (like Brown Bear, Brown Bear, What do you see?) you know that they don't actually have to be able to read to recite the entire book :)  Even better!  

Charlotte can focus on the idea of pointing to words as she "reads" them without having to do all of the other "reading" work.  The pattern makes it an easy read, giving her independence and confidence.  This is a book that she will keep in her "quiet time" basket so she can read it to herself over and over again.  Also, one simple sentence with one simple picture keeps it basic and best for learning.

Put your kid's name on the cover!

Keep it really simple with basic graphics.

Only 4 large words encourages Charlotte to point to each as she says them.


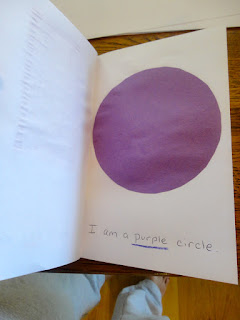
While Charlotte is almost 4, Adelyn is just barely 2.  She is learning about things like colors and shapes right now. So, we made a book this morning that reviewed shapes and colors.  I made it in the same simple pattern because she has a big sister who LOVES reading this to her.  However, if you have just a 2 year old, you could simply write the name of the shape at the bottom of the page and leave it at that.  Your 2 year old is looking at the pictures.

Again, put your child's name lots of places :)

I made this pattern simple, underlining the color with a crayon.

You could have your kid draw their own circle on the left!

Charlotte already loves reading this book to Adelyn because she is a super-star sister.  However, Adelyn decided quickly that she also likes to read her book on her own.  Here is what you would want your 2 year old to do: Turn pages and identify colors and shapes.  


You can always laminate the cover of your book to make it more durable.  Of course you want to keep these books where your kids can get their hands on them as much as possible!  Practice at storytime.  You read one book to your child, then have them read one book to you :)

Good Luck!

Let me know how your book-making goes and what type of book you made :)


Monday, October 29, 2012

Teaching your kiddo to read

There are about a million different ways to teach your child to read.  I'm no literacy specialist, but I have some basic training in K-8 literacy (enough to be dangerous).  A friend recommended this book to me and here are a few reasons I love it so far:

1) It is designed for a parent-child interaction, not for a classroom.
2) Each lesson is pretty short (20-30 minutes).
3) It is a scripted book so even if you know NOTHING about literacy, you can do it!
4) Each lesson is broken into a few different "activities" that Charlotte thinks are pretty fun.

I got this copy from Walmart.com for $12.99
http://www.walmart.com/ip/390907 

Notice the "script" for each lesson

This is a later lesson

It even gives you a guide on pronouncing
Ok, so my daughter is 3 1/2, which is on the young end of the spectrum they list in this book.  As with anything I would teach, I know I have to take my time.  Charlotte has a normal attention span for a 3 1/2 year old (which is to say almost non-existent).  Some days we can do an entire "Lesson" in no time flat.  Other days we can't seem to get through 1/2 of a "lesson".  Who cares?  If the idea is to teach my child to eventually read, I should move at her pace, right?  If she doesn't seem to be in it one day, I move on to something else, or cut it off at 1/2 a lesson. 

So, here are a few recommendations for any program you try:
  • Keep it fun (If they are bored, stop)
  • Span out the lessons if they seem to be struggling
  • Do other "fun" activities to reiterate the parts they seem to struggle with
  • Take your time
  • Remind yourself that this is a bonding experience that no one can ever replace :)
Charlotte and I are currently on Lesson 14.  We've taken weeks off here and there and rarely do a lesson daily.  A few things that Charlotte seemed to struggle with in this particular program were the "rhyming" activities and the normal "sounding out" of words.  So, we've reiterated these two things over the last few weeks, without teaching more lessons.  Today, I taught a new lesson and we sailed through the lesson.  My patience definitely paid off and her confidence is a sure sign!


Sidewalk chalk makes everything more fun!
One of the things we've been "reviewing" is sounding out words.  I like to write them on the sidewalk with sidewalk chalk.  This allows Charlotte to "hop" along the word instead of just using her finger in a book.  If you know my child or watch her in the video below, you will see why this is helpful :)  However, as a teacher, I can tell you that most kids benefit from this type of kinesthetic activity.

I copy them exactly as shown in the book
 Another reason this is great is that it's there every time we go outside.  A great way to have your child "review" (if you're at home with them during the day, especially) is to show Daddy when he gets home.  It's a win-win interaction.  It shares with Daddy what we've been learning AND gets your child to review an extra time.


I also noticed that Charlotte seemed to minimally understand rhyming words.  So, I went to the library and asked those amazing librarians to help me find some narrative stories with rhyming words.  So, as we read out bedtime stories, Charlotte listens for rhyming words (and yells them out if she hears them). This is an easy way to review rhyming words, while also reading a story that will engage Adelyn (my 2 year old).  Here are a few of the books we have this week for this purpose.  There are tons of examples though.  Your public librarian can probably hand you 10 without thinking twice.


I'm sure I will have updates and new learnings as we move throughout this program.  Right now, we're at a good place and moving at the perfect pace for Charlotte.  If you decide to give it a whirl, good luck!  Let me know how it's going and what you might need help with!


Tuesday, August 14, 2012

Color Containers

Again, I'm a teacher at heart, which means....I'm cheap :)

I'm forever going to Lakeshore Learning (a teacher-ish store) and getting ideas just to come home and do it my own way.  Adelyn just turned 2 which means she's into the world of colors.  Here's an idea I got at Lakeshore and perfected at home when Charlotte was 2.  I'm doing it again right now with Adelyn.

First - spend a week or two keeping and washing out old plastic containers (sour cream, cottage cheese, hummus, etc).  If you don't have any paint on hand, buy some easy acrylic paint from Walmart or Michaels (99 cents at most)
Re-purpose old plastic containers with acrylic paint 
Start with one color or two colors that are VERY different.  I chose purple and yellow because Adelyn loves yellow and purple looks quite different.  Paint the containers, let them dry & write the color on the top with Sharpie.

Next is the fun part :)  SCAVENGER HUNT!  Kids of all ages love scavenger hunts.  It's how I've taught Charlotte letters, numbers, colors, shapes, etc.  Take your two (or you could start with just 1) container and search your house for things that are that color.  You want to stick to things that are mostly or completely that color.  

Our finds: Mr. Potato-head pieces, kitchen pieces, hair bows, bracelets, beads, etc.
Two colored containers filled
Put the lids on and you're done for now!  Leave them out in the open so that they play with the containers and the contents regularly.  Be sure to say those two colors over and over again as you see them over the next few days.  I like to remind the girls to "show Daddy" anything new at night so that they review and Daddy knows what we're doing during the day (win-win).

Here's the hard part - wait....

We tend to get excited and overdo it sometimes, trying to teach our kids 100 things at a time. 

Resist the temptation.  

Give it a week or so to marinate in their brains and refer to and play with the containers and colors regularly.

Adelyn finding red beads

Then, pick a completely different color and scavenger hunt again!

People think that colors are really concrete, but truly they are a really abstract idea.  There are tons of shades of red, shades of pink, etc that we don't think about.  Scavenger hunting allows our kids to find examples and non-examples of each color.  Beware of doing close-colors together.

The girls finding red hair bows


Notice in this video that Adelyn struggles with differentiating between orange and red.  This is perfectly common and expected.  These are really close colors and depending on the shade can look really similar.  She is also finding "nonexamples" of red and putting them to the side.

The sorting activities I'll share below really help kids learn to differentiate between these.  I'll probably do green next to separate orange from red.


Lastly, after doing a few containers, you can dump them all into a big pile and "sort" them into containers.  The girls really like this, but it's also fun for me to sort and make pretend-mistakes. This is a really common strategy that I used in the classroom and kids find it particularly funny :) and therefore really engaging.  Notice how engaged both girls are in this simply because I'm making mistakes.

Every time you add a new color, you repeat any/all of these activities.  Again - you'll want to wait.  Resist the temptation to move too quickly.  It will probably takes months for us to "finish" our color containers.

Calendar time

I'm a teacher.  I really can't help it.  It's just who I am.  I love learning whether it's math-related or not.  I love the real-life, relatable kind of learning! One of the many reasons I decided to stay at home full time with my kiddos was to impact those learning-packed first 5 years of life. I think we all want this, really.  So, as a teacher - I feel the need to share everything so other Mommas can steal ideas if they want :)

Charlotte is 3 1/2 and we've begun to realize that she doesn't have a really good grasp of time as far as days of the week, etc.  Calendars are a great thing for young kids, so I headed to Lakeshore Learning and got this heavy-duty calendar.  You could totally make one yourself, but I'm thinking this is going to be something we use for a long time in our house, so I decided to buy one that will last. I hung it on our front door (metal) with 3 heavy-duty clips.


We've been working on moving our "today" marker each day and counting the days, saying the day of the week, etc.  Charlotte especially likes seeing the different colored days for the weekends so she knows when Daddy gets to stay home all day with us!  We're just starting so I'm keeping it kind of simple this first month, but we've put a marker on "Vacation" and one this week to show when we're going to a friend's house.  We've worked on counting to see how many days there are until vacation.  This is an early math skill (to learn not to count today but to count "jumps" forward).

Another big reason I thought a calendar would be great is that Charlotte has mastered numbers 1-10 and most of her 11-20 numbers, but not all of them.  A calendar is a great way to work on numbers 1-31 in a really natural way :)

After we figured out what day it was today (the 14th) we used an empty glass container (this is an empty bouillon container).  Glass works well because you can see through it.  We spent awhile just counting 14 things into the container over and over again.  I wrote 14 on the container with a vis-a-vis pen (wet erase) marker so we can change the number each day.

everyone is counting 14 goldfish

We've filled it with 14 pretzels

14 berry kix


Here is Charlotte counting 14 fruit snacks

After our 14 container, the girls just did some counting.  Here's a video of Charlotte counting.  She omits 15 and 20 (which is totally normal).  She also doesn't get to "30" but instead uses a pattern to count to "twenty-ten" and beyond.  This is really common and exactly why we're doing this daily counting :)


For anyone with more than 1 kid, obviously any learning has to be differentiated so that both ages are learning something.  It was easier when I just had to think about what Charlotte was learning.  Adelyn is jumping right into the counting.  She just turned 2 last week.  What am I working on with her?  We're learning to count (1-10 will be our focus) and one-to-one correspondence.  This is when you point to 1 thing for every 1 number you say.  Charlotte has mastered this, but Adelyn will hopefully be learning this through our calendar time :)


This is all adapted from the idea of calendar math, which is used in preschools and elementary schools. It's something that is SO easy to do at home and calendars can a skill that can be adapted to a variety of ages.  You can add your family's events, etc so everyone is involved!